To add a Trello label, open a card, select Add > Labels, and choose a label. Use the pencil beside it to give it a name; then open Filter cards to see cards carrying that label. Labels add a category such as Bug, Urgent or Client A, while the list a card sits in can keep showing its stage.
Normal board members can edit the board, including its labels. If you're an observer with read-only access, ask a normal member or board admin to make the change. These steps follow the web interface.
Labels belong to one board. Naming a label Client A here doesn't create it on your other boards, so settle on names the people using this board will recognize.
Put a label on a card
Have the board open in a browser, with the card visible in its list and your role a normal member or above.
- Open the card. Click the card you want to label in its board list. The Add menu sits below the card title.
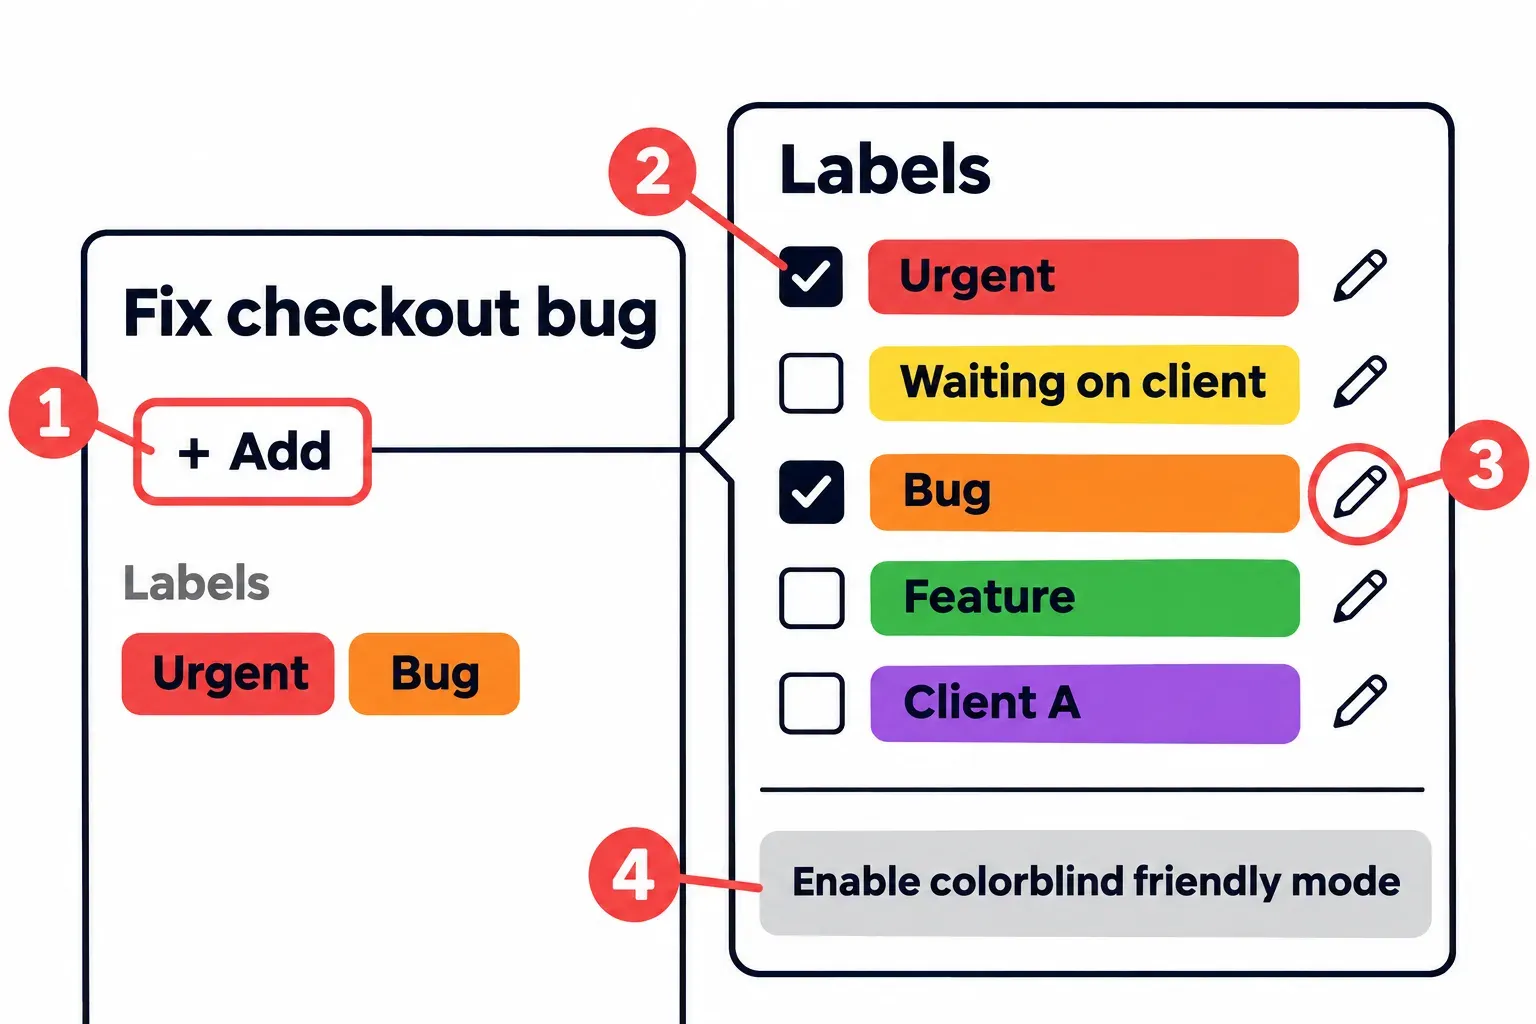
- Select Add, then Labels. The board's labels list opens: each label is a color bar carrying its name if it has one, with a pencil icon for editing. If none fits, choose Create a new label and give the new category a name and color.
- Select the label. The label gets a white check mark in the list and appears under Labels on the card back. Select more colors for more labels, since Atlassian's page on card labels allows several on one card. Close the card to check the result: the colors now sit on the card front in its list. A colorless label is the exception, shown in light gray on the card back only.
For a quicker route, hover over the card and press l to open its labels, or select the card's pencil icon and choose Edit labels. Right-clicking the card also opens that editing menu. The label menu works in both directions: select an active label again to remove it.
Name a label, change its color or delete it
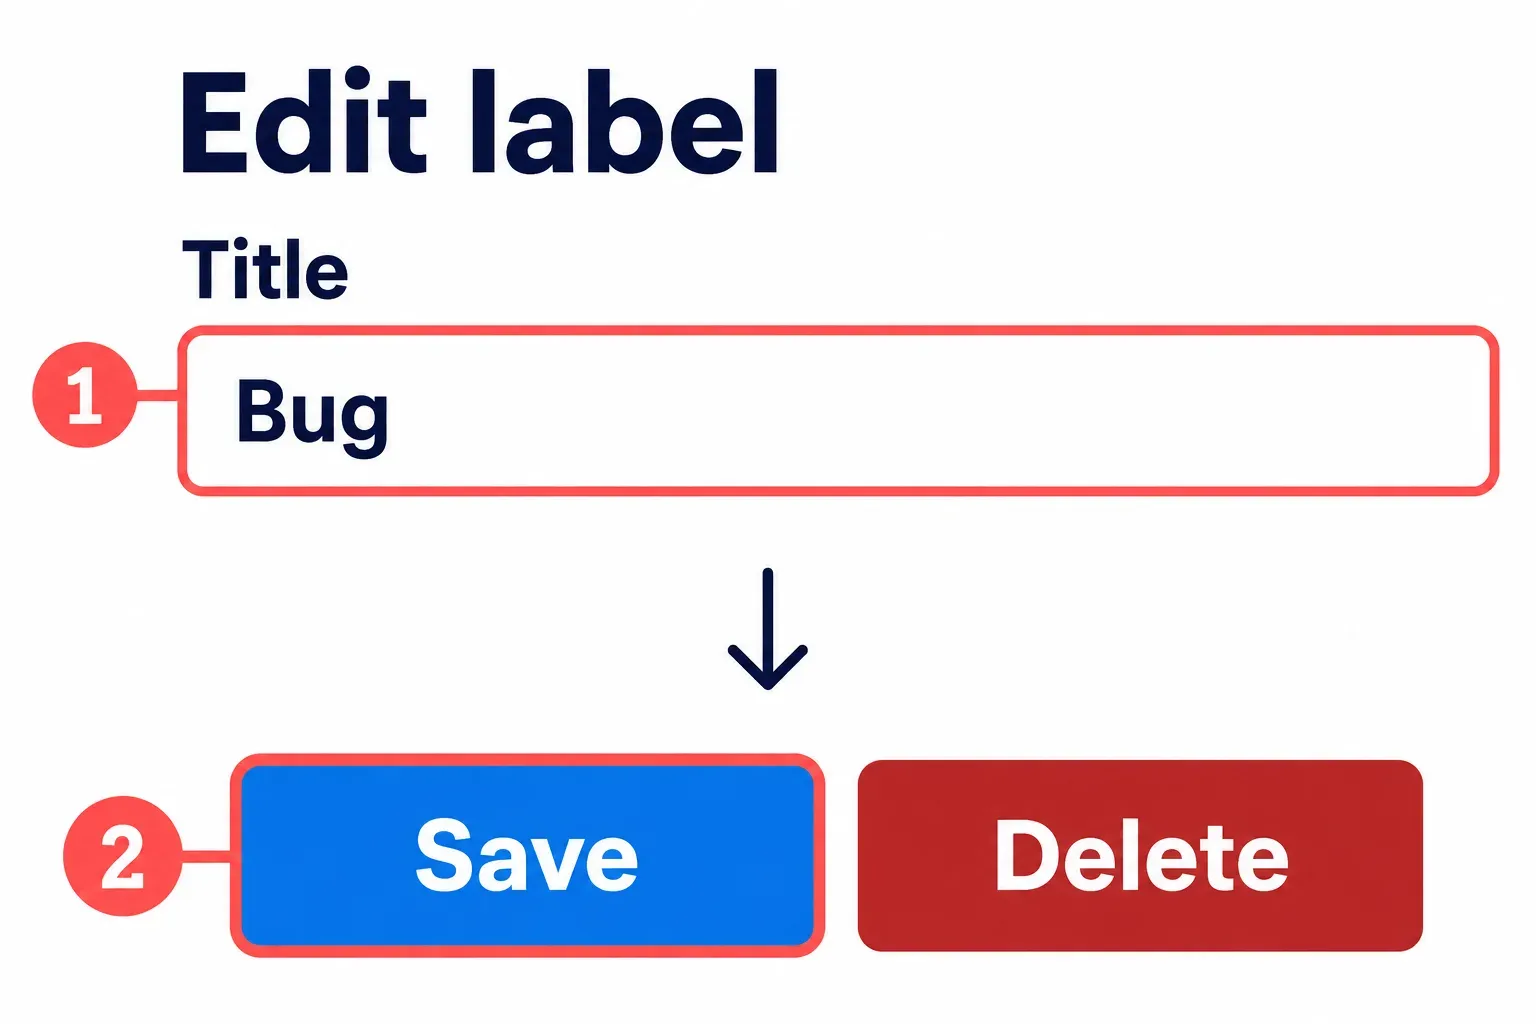
Hover over a card, select its pencil icon and choose Edit labels. Select the pencil beside the label you want to change. In the edit screen, change its title, choose a color and select Save. Trello offers 30 colors plus a colorless option. A colorless label stays on the card back but disappears from the front.
To manage labels without opening a card, open the board menu in the header and choose More > Labels. Renaming or recoloring changes the existing label, so check its meaning across the board before making that edit.
Name every label, colorless ones included. A purple with no name reads as client work to one person and as blocked to the next, and the name is what the label: search further down matches.
Deleting a label cannot be undone. It removes the label from every card on the board. If the meaning has changed, rename it instead so the cards keep their category.
Before deleting, filter the board by the label to inspect the live cards that will lose it. Check archived cards too: open the board menu, choose More > Archived items, then search for label:"Client A", substituting your label's name. Archived items accepts the same search operators as Trello search. When the label really has to go, return to its edit screen and select Delete. Removing a label leaves the cards themselves in place.
Once a board holds more than 10 labels, Trello suggests the labels most recently used in each list. Anyone who prefers the plain list can switch suggestions off under Account (top right) > Settings > Disable suggestions.
Show label names on the card front
Card fronts show label colors by default. Click a label on a card front to show its name; click again to hide the name. Press ; to toggle label names from the keyboard. If another person still sees bare colors, they can use the same toggle.
Colorblind friendly mode
Open the labels menu from a card or from the board and choose Enable colorblind friendly mode. It adds symbols to all labels across all boards on your own Trello account, and Disable colorblind friendly mode takes them away. Because the setting belongs to your account, each teammate who needs the symbols switches it on for themselves. That is one more reason to name labels: a name on the card back or in the filter reads the same to everyone, whatever their color vision or their settings.
Filter a board by labels
The board filter answers which cards carry a label without moving any of them. With the board open in a browser:
- Open the filter. Select Filter cards on the board, or press f. Its options cover keywords, members, card status, due dates, labels and activity.
- Pick one or more labels. Cards without a matching label drop out of view in every list at once.
- Choose how several labels combine. Any match keeps a card that carries any one of the selected labels; Exact match keeps only cards that carry every selected label. With Bug and Client A both selected, Any match shows every bug and every Client A card, while Exact match shows only Client A's bugs. Picks in different categories narrow each other, so a label plus a member leaves that member's cards with that label. Pressing q filters the board to your own cards.

If cards seem to have disappeared, clear the filter before searching the archive. A board filter stays active until you clear it, including after a refresh or logout. Select Clear filters at the top of the board or press x; the board shows all its cards again.
In the mobile app, open the board, select Filter cards, pick a label and select Return to apply the filter. The X beside the filter at the top of the board clears it.
Find labeled cards across boards
To find labeled cards across the boards you can access, use Trello's top search box with the label: search operator. Enter label:"Client A" to search by name, label:red or #red by color, and -label:"Client A" to exclude a label. Put a name containing spaces in quotation marks.
For a view of several boards at once, Workspace Table view on Premium and Enterprise combines up to 20 boards from one Workspace. You can filter by label and change a card's label directly in the table.
Label ideas: give each group one question
Start with the question someone will ask when choosing a card. A useful label might identify urgent work, a client or a bug. A label nobody will filter by adds another thing to maintain. The examples below are suggested schemes; keep only the groups your board needs.
I'd leave stage to the lists, because a Doing label can stay behind after someone moves the card to Done. Labels work better for categories a card keeps as it moves through the board.
| Label (color) | Question it answers | Who filters by it, and when |
|---|---|---|
| Urgent (red) | Does this move before anything else? | The lead, when choosing the day's work |
| Waiting on client (yellow) | Is the card stuck outside the team? | Whoever writes to clients, before sending reminders |
| Bug (orange) | Is something broken? | A developer picking the next card |
| Feature (green) | Is this new work? | Whoever plans the next week's cards |
| Client A (purple), Client B (blue) | Who is this for? | The account lead before a client call |
| Small (pink) | Does it fit into a spare hour? | Anyone with a gap between meetings |
For priority, I'd start with a single Urgent label because it makes the next decision clear without asking people to rank every card High, Medium or Low. Add more levels only when someone uses those levels to choose work. On Premium and Enterprise, Dashboard view includes a Cards per label tile, so consistent names also make that chart easier to read.
When a list or a Custom Field fits better
A list fits a stage such as Ready, Doing or Done. A Custom Field fits one value per card, such as a client selected from a dropdown or an estimate entered as a number. Custom Fields are available from Standard up.
Keep labels when a card needs several categories or the color itself helps you scan the board. Choose a Dropdown Custom Field when every card should have one client. The board filter's keyword field can search Custom Field values, so you can still narrow the board to that client.
Apply a label with Automation
Automation can apply labels when a deadline or card move makes the category predictable. Atlassian's due date automation example adds a red Urgent label a day before a card is due. Open the board menu and select Automation to create or manage an automation; review its trigger and actions before saving. The Free plan includes 250 Workspace command runs per month, so frequent labeling rules share that allowance with your other automations.
Keep labels the same across boards in one Workspace
There isn't a single Workspace-wide label set. To reuse a scheme, begin with the built-in route: move a card carrying the labels to another board. Trello creates those labels on the target board automatically.
For example, make a spare card carrying the label scheme, then move it through the boards that need those categories. Check each destination's labels before using them on real work. After copying a board or starting one from a template, make the same check instead of assuming the scheme is complete.
Write the meanings in About this board. Any board member can edit that description, so keep one agreed wording for each label. Consistent spelling also prevents searches from splitting Client A and ClientA into separate categories.
For ongoing synchronization, Cardflow's Unify Labels listing describes sharing selected labels between boards. Compare its permissions and terms before adding it. Moving a setup card is enough when you only need to seed a new board once.
Reorder labels
Atlassian's built-in labels guide doesn't document a manual ordering control. The Reorder(able) Labels listing describes a separate Reorder labels dropdown where you can drag labels into an order. That orders the Power-Up's own interface. Its listing also describes propagating an order to native labels by remapping colors; skip that route if your colors already carry agreed meanings, because it changes the scheme people read.
Before relabeling an older board, pick one busy list and check which categories still help someone choose a card. Rename ambiguous labels first. Delete a category only after inspecting both the visible cards and the archive for work that still needs it.