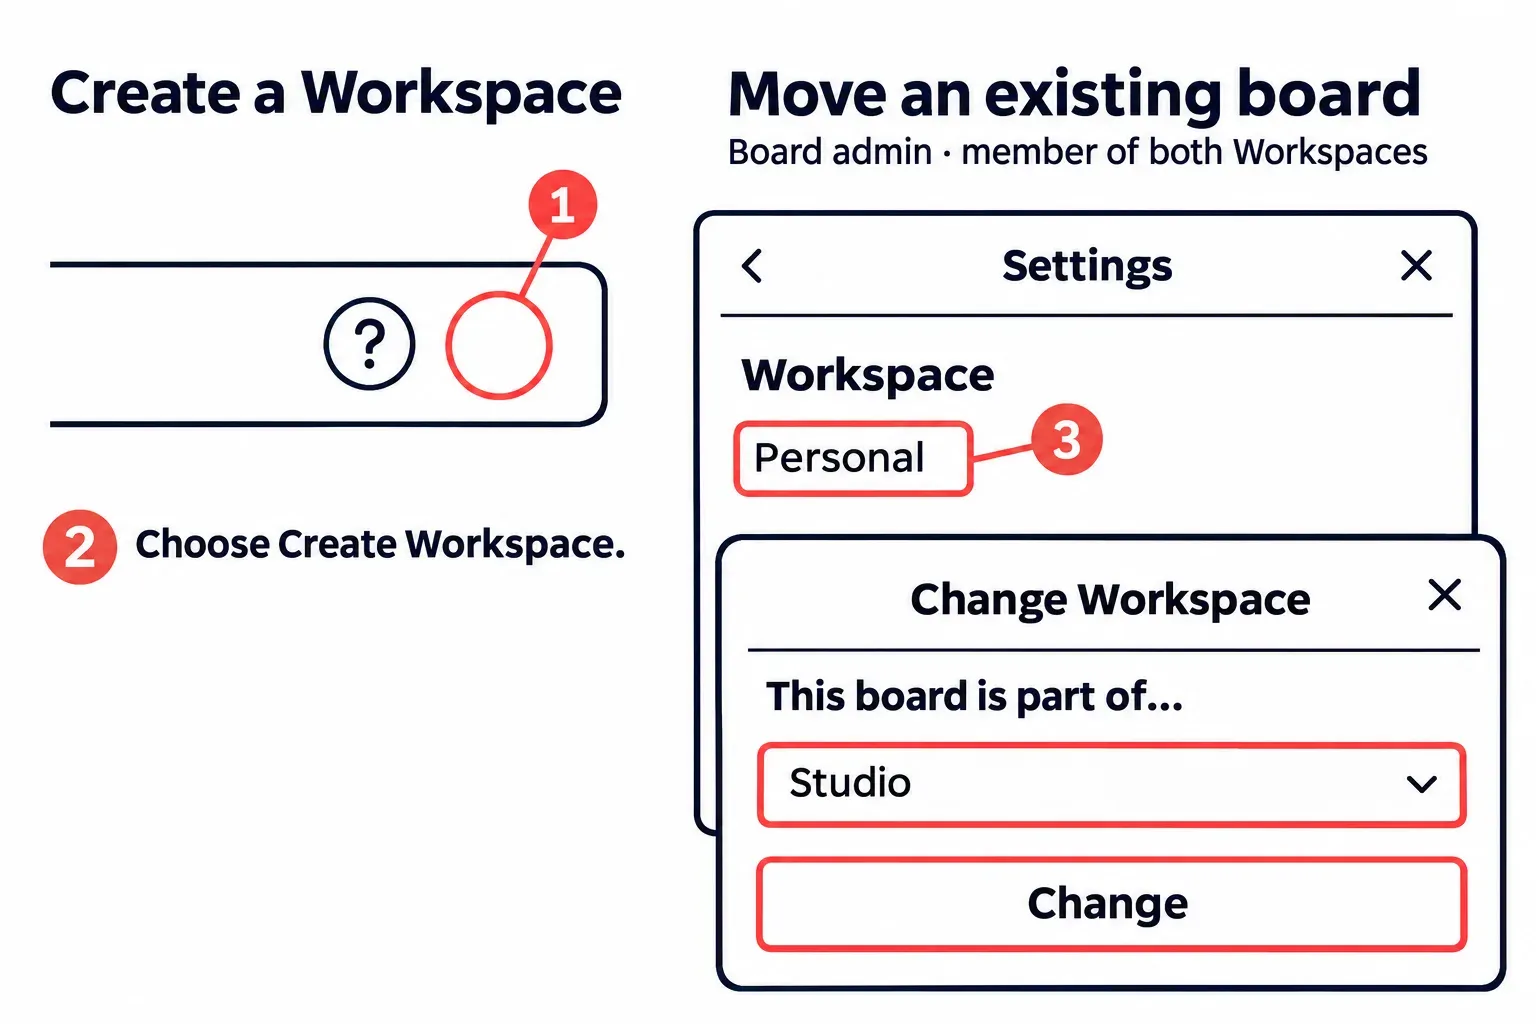
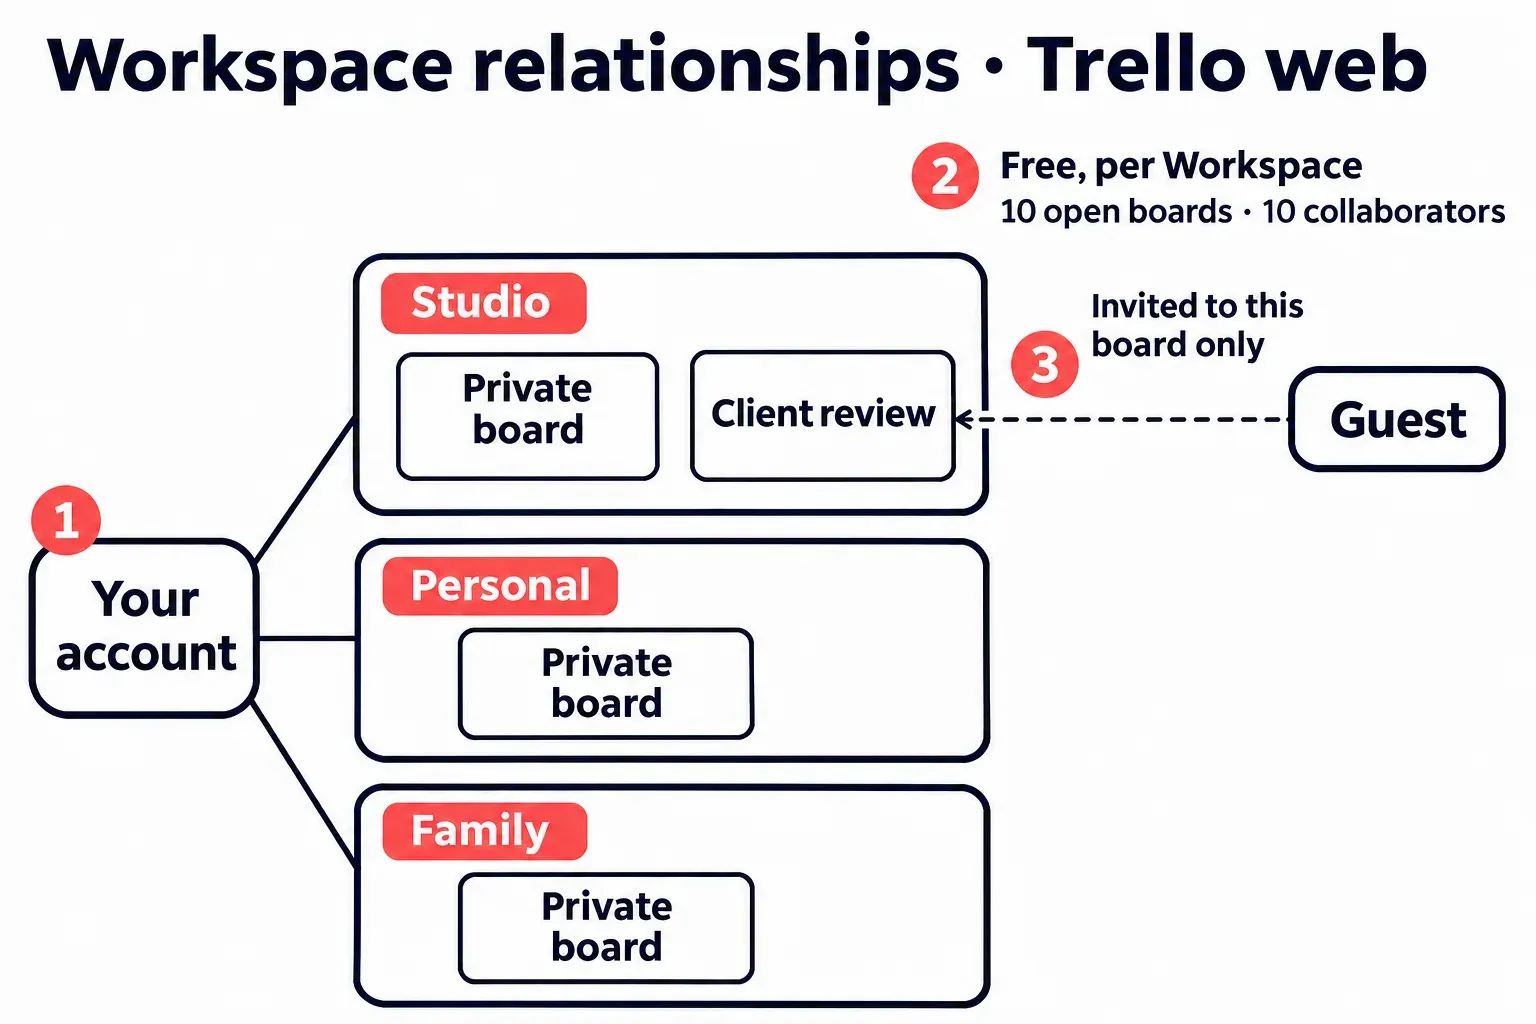
Open your profile icon at the right of Trello’s header and choose Create Workspace, then follow the prompts. Creating a Workspace is free, and every member of a Free Workspace is a Workspace admin. You can have more than one Workspace; Free’s limits are 10 open boards and 10 collaborators in each Workspace.
A Workspace holds boards and the people who work on them. Every board belongs to one, and a paid upgrade covers that Workspace. I’d keep the same group’s projects together, because separate paid Workspaces can charge for the same people again. A second Workspace makes sense for a different group or budget.
Use Trello in a browser on a computer for the creation steps below. If the Create button in the header has no Workspace option, open the profile menu instead: that’s the route Atlassian documents. The existing Workspace and the new one are called Personal and Studio in this example.
Create Workspace is in the profile menu
Sign in and choose a name people will recognise when switching boards. Creating Studio won’t move Personal’s boards or add anyone to them; those are separate steps.
- Select your profile icon at the far right of the global header. Trello’s navigation guide calls this Your profile and settings.
- Choose Create Workspace and follow the setup prompts. Use Studio as the name if you’re following the example; you can edit the Workspace details later.
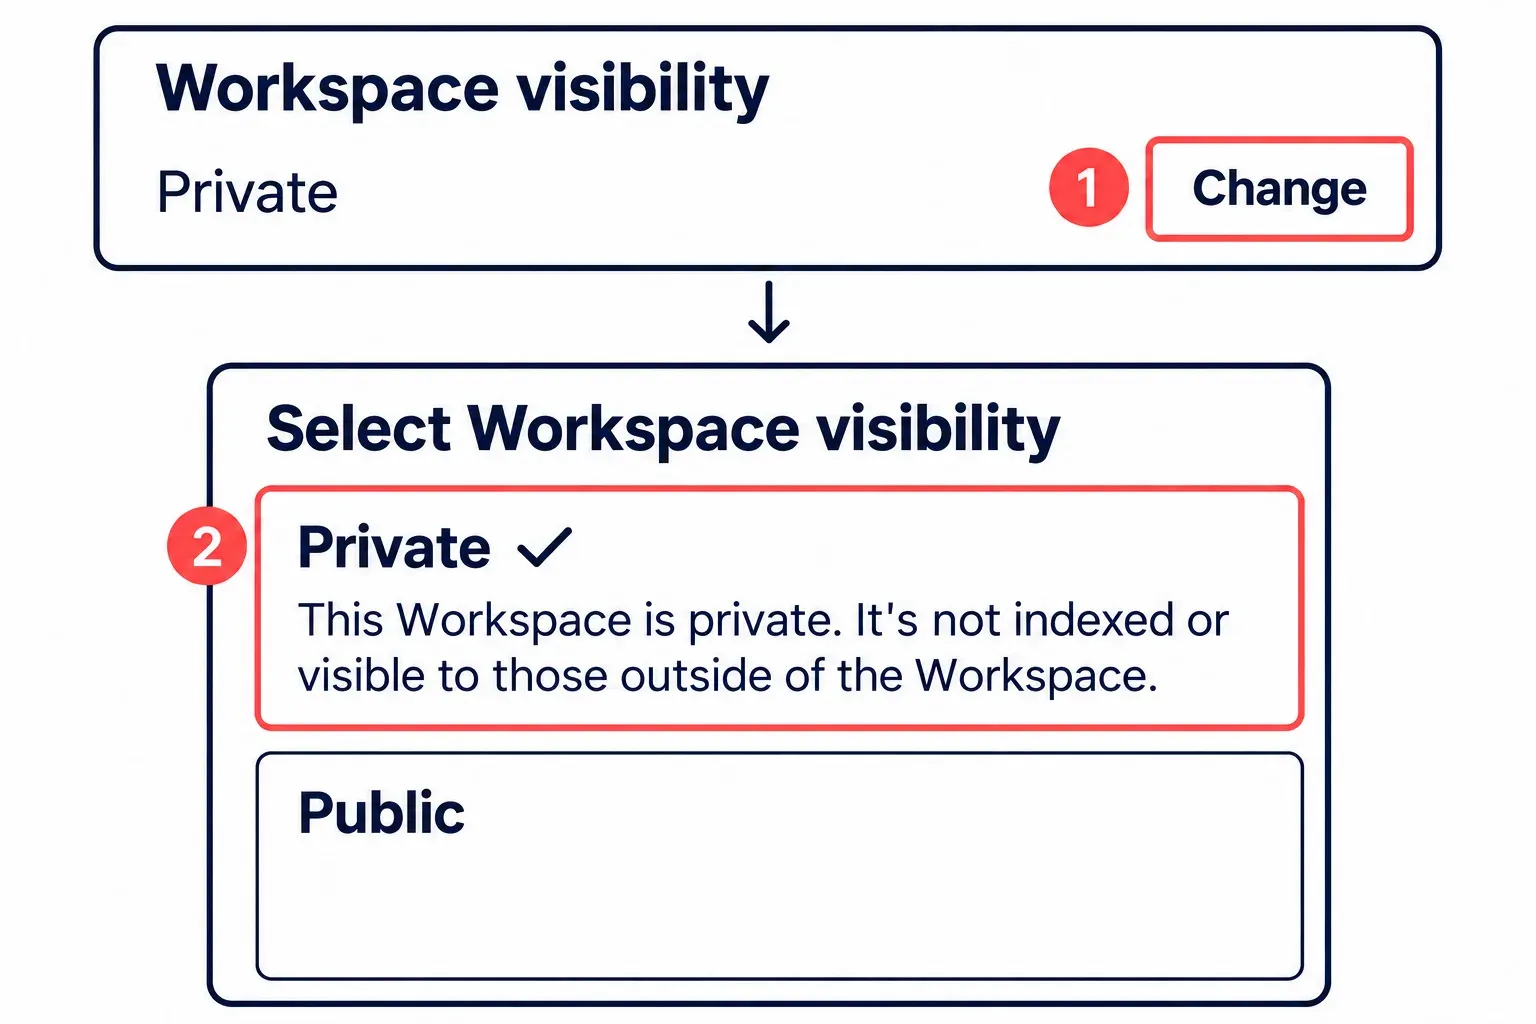
- Finish the prompts, then select the Trello logo to return Home. Find Studio in the Workspace sidebar. You’re a Workspace admin, and its visibility starts as Private.
On a phone, look for the new Workspace through its boards: the iOS app lists boards on its Boards tab, while on other platforms, Android included, the Home screen groups boards by Workspace, as Atlassian's troubleshooting page for board creation describes.
If you went to the Create button first
The header’s Create button is documented for a new board or Workspace view. Older walkthroughs put Workspace creation there too; use the profile menu when that option is missing.
A new board can still lead to a new Workspace. Under Create, Create Board asks for a title and for the Workspace the board goes in, and Atlassian's board creation steps say you can create a new Workspace from that choice when none is available to you.
Name, type, short name and visibility
To edit Studio, open it from the Home sidebar and choose Settings → Workspace settings, then the edit icon beside its name. From a board, the newer navigation route is Switch board → Workspace → More (…) → Settings. Workspace settings hold the name and profile details:
- Workspace name, the label everyone sees in the sidebar.
- Workspace type, which changes the template suggestions Trello offers.
- Short name, used in the Workspace's web address. It must be unique and cannot match another Workspace's short name or anyone's username.
- Website and Description, both optional.
Keep the Workspace Private for client work or personal plans. A Public Workspace exposes its members and public boards to visitors and search engines; private boards remain hidden. Board visibility is a separate choice: new boards default to Workspace visible, so choose Private in the board creation form for confidential work. Standard and Premium Workspace admins also have admin access to private boards.
Move boards in from the old Workspace
A board changes Workspace from its own settings, and three things have to be true of you: you are an admin of that board, a member of the Workspace it sits in now and a member of the one it is going to, as Atlassian's page on moving a board between Workspaces lists them. Having created Studio, you already belong to it; boards someone else administers need that person to move them or to make you a board admin. On Premium and Enterprise a Workspace admin can also restrict who creates, copies and moves boards, so a move that is not offered to you may be blocked on purpose.
Read what the move changes before you press Change:
- Board members who aren’t members of the destination Workspace are treated as its guests. Check the warnings below before assuming everyone will keep access.
- On a free Workspace the move can raise the collaborator count, because those guests count toward its 10.
- On Standard or Premium, a guest who ends up on a second board becomes billable. The move warning depends on who moves the board: a Workspace admin is warned about new multi-board guests; another user is warned that the affected guests will be removed to avoid charges. On mobile, the move can be blocked or offered only with those guests removed. Use the website and review the warning before continuing.
- Custom Fields and advanced checklists require Standard or higher. A board must sit in the upgraded Workspace to use its paid features. Moving it into a Free Workspace removes access to those features.
- Open the board, open its board menu and select Settings. The panel shows a Workspace heading with the board's current Workspace, Personal, under it.
- Select the Workspace name. A Change Workspace box opens with the line "This board is part of..." over a drop-down.
- Pick Studio in the drop-down and select Change. Open Settings again to check: the Workspace heading now reads Studio, and the board is listed among Studio's boards when you open that Workspace from the sidebar.
Repeat this for each board that should move, one at a time, and look at Studio's member list after each move to see who arrived as a guest.
Invite members, share a link or add guests
In a free Workspace any member can invite, since every member is an admin. On Standard and Premium, a Workspace admin sends invitations, and adding a new member can create a prorated charge. The steps, from Atlassian's page on inviting people to a Workspace:
- Select the Trello logo in the header, or Switch boards from the navigation bar on any board, then select Studio and its Members page. Some Atlassian pages call this page Collaborators; it is the same list of people.
- Select Workspace members, then Invite Workspace members.
- Enter an email address or a Trello username, with semicolons between several. Someone without a Trello account receives an email asking them to sign up.
Check the Members page for the invitations. On Free, a pending invitation already counts toward the 10 collaborators. Joining the Workspace doesn’t automatically put someone on its boards, so add each person to the boards whose cards they need to move.
For a group you trust, Invite with link on the Collaborators page copies a joining link under Invite members to join you. Anyone who receives or is forwarded the link can join while the inviter retains permission. Everyone who joins counts toward the Free limit. Use Delete link → Delete share link after the intended people have joined.
A client, contractor or intern who needs one board rather than the whole Workspace belongs on that board as a guest, meaning a board member who is not a Workspace member. Atlassian's page on board guests spells out what that means: guest membership grants access to the boards they are invited to, including every card on them, and counts toward the collaborator limit. Guests cost nothing on Free; on Standard and Premium a single-board guest is not billed and a multi-board guest is billed like a member. Premium and Enterprise Workspace admins can restrict board invitations to Workspace members only. When a guest becomes part of the group, the Members page has a Guests section where Add to Workspace makes them a member. On Standard or Premium, you pay no extra charge when an already-billed multi-board guest becomes a Workspace member.
How many Workspaces one account can hold
You can have multiple Workspaces. The Workspace guide describes using several, but the Support pages and pricing table don’t publish a numerical account-wide creation cap for Free, Standard or Premium. “Unlimited Workspaces” appears in the Enterprise column. For a Free Workspace, the documented limits are:
- 10 open boards. Closed boards do not count, and a closed board can be reopened when there is room again, according to Atlassian's explanation of the board limit.
- 10 collaborators: Workspace members, guests on one board or several, and pending invitations to the Workspace or its boards. People who are only on closed boards, deactivated accounts and join requests not yet approved are left out. Admins see the current count in the sidebar of the Members page, as Atlassian's collaborator limit page explains.
At 10 collaborators, you can’t add a new person. Above 10, the Workspace’s boards become view-only and its automations stop. After a paid plan ends, the Free limit applies from the end of the subscription.
Standard and Premium remove the Free board and collaborator limits. An upgrade applies to one Workspace, so upgrading Studio won’t upgrade Personal. Manage billing in a web browser. Start with Free unless its limits or a specific paid feature block the work.
A second Workspace or one more board?
Atlassian's explainer on Workspaces recommends one Workspace per group or company, with projects as boards inside it and Premium’s Collections to group them, partly because upgrading one Workspace to Premium is easier and cheaper than upgrading several. Admin rights lean the same way: on Free a Workspace admin has no admin control over its boards, while on Standard and Premium Workspace admins are admins on every board in the Workspace.
Use a new board for another project with the same people. A new Workspace earns its place when the group or budget changes:
- A different group of people, such as a household next to a work group, or a business unit inside a large organisation. On Enterprise, the explainer adds, you pay once per unique member however many Workspaces in the Enterprise they belong to.
- A full free Workspace. For people working alone or on small personal projects, Atlassian suggests closing boards you no longer use or opening a new Workspace for new boards.
- A separate budget. A paid plan covers the one Workspace it was bought for, so a group on a paid plan and a side project that stays on Free need a Workspace each.
A client does not need a Workspace to follow their work. As a guest on one board they see every card on it, so internal cards such as rates or other clients' names belong on a board the client is not on.
If you created Studio but meant to combine it with Personal, Trello’s merge process moves boards and invites members into the destination. Move boards one at a time and check their guests before the next move. Keep the old Workspace until its boards and members are accounted for.
If you only want to leave the old Workspace, open its Workspace members page, find yourself and select Leave. The only Workspace admin must appoint another admin before leaving.